Memasang 'Give Feedback Button'.


Memasang 'Give Feedback Button' bertujuan memudahkan pembaca memberi maklum balas secara terus kepada penulis melalui email.

Bagaimana untuk memasang 'Give Feedback Button' ?

Sila ikuti beberapa langkah mudah di bawah.

1. Sign in akaun blogger anda.

2. Pilih LAYOUT --> EDIT HTML.

3. BACKUP TEMPLATE anda dahulu untuk mengelakkan sebarang masalah.

4. Klik pada EXPAND WIDGET TEMPLATE seperti screenshot di bawah ini.

Malaysia Blogger Hack

5. Cari kod ini.

]]></b:skin>

6. Copy kod di bawah dan letakkan di atas kod tadi.


#givefeedback img {

border:0px;

float:right;

position:fixed;

right:-13px;

bottom:-13px;

}


#givefeedback img:hover { right:-5px; bottom:-5px;
}


07. Cari kod ini.

<div id='outer-wrapper'>

08. Copy kod di bawah dan letakkan di bawah kod tadi.

<div id='givefeedback'>

<a href='mailto:EMAIL ANDA@gmail.com' target='blank'>

<img src='https://blogger.googleusercontent.com/img/b/R29vZ2xl/AVvXsEh3DFGtRKS-0vmoRvgdpB5HbW2OWrswsImgpfYsE4bbqk2N3WHrczBw1UixwoLU_ahW9GhqxvF4dfCXSEx0nmzez4NT5qHOs8ZzDV-rufgL1-1t0cmfs3NkgrGLSmYBe0hcraD7cXDwO0Q/s400/Give-Feedback.png'/>

</a>

</div>

Gantikan text berwarna biru kepada email anda.

9. Save Template.

10. View blog untuk melihat hasilnya.

11. Selamat Mencuba.

READ MORE...

Memasang 'Tab View 3 In 1'.


Tab view 3 in 1 menampilkan entri popular yang mendapat komen tertinggi, nama pemberi komen terbanyak dan komen terbaru.

Tab view ini akan memberikan penampilan yang lebih kemas serta menjimatkan ruang blog anda

Sekiranya anda mahu memasang tab view ini sila ikuti beberapa langkah mudah di bawah.

1. Sign in akaun blogger anda.

2. Pilih LAYOUT --> EDIT HTML.

3. BACKUP TEMPLATE anda dahulu untuk mengelakkan sebarang masalah.

4. Cari kod ini.

]]></b:skin>

5. Copy kod di bawah dan letakkan di atas kod tadi.


div.TabView div.Tabs

{

height: 24px;

overflow: hidden;

}

div.TabView div.Tabs a

{

float: left;

display: block;

width: 90px; /* Lebar Kotak Tajuk */ text-align: center;

height: 24px; /* Tinggi Kotak Tajuk */

padding-top: 3px;

vertical-align: middle;

border: 1px solid #000; /* Warna Border Kotak Tajuk */

border-bottom-width: 0;

text-decoration: none;

font-family: "Times New Roman", Serif; /* Tulisan Kotak Tajuk */

font-weight: 900;

color: #000; /* Warna Tulisan Kotak Tajuk */

}

div.TabView div.Tabs a:hover, div.TabView div.Tabs a.Active

{

background-color: #FFFF66; /* Warna Background Kotak Tajuk */

}

div.TabView div.Pages

{

clear: both;

border: 1px solid #6E6E6E; /* Warna Border Kotak Isi */

overflow: hidden;

background-color: #FFFF66; /* Warna Background Kotak Isi */

}

div.TabView div.Pages div.Page

{

height: 100%;

padding: 0px;

overflow: hidden;

}

div.TabView div.Pages div.Page div.Pad

{

padding: 3px 5px;

}

Perhatian !!! Anda boleh mengubah kod berwarna biru mengikut kesesuaian saiz yang anda mahukan.

6. Seterusnya cari kod ini.

</head>

7. Copy kod di bawah dan letakkan di atas kod tadi.

<script src='http://syamzone.fileave.com/Tab View Menu.txt' type='text/javascript'/>

8. Save Template anda.

9. Langkah seterusnya pilih 'Layout'--> 'Add a Gadget'--> 'Html / Javascript'.

10. Copy kod di bawah dan Paste.

<form action="tabview.html" method="get">

<div id="TabView" class="TabView">

<div style="width: 280px;" class="Tabs">

<a>Popular</a>

<a>Top</a>

<a>Terbaru</a>

</div>

<div style="width: 280px; height: 350px;" class="Pages">


<div class="Page">

<div class="Pad">

<script type="text/javascript">

function pipeCallback(obj) {

document.write('<ul style="text-transform: capitalize;">');

var i;

for (i = 0; i < obj.count ; i++)

{

var href = "'" + obj.value.items[i].link + "'";

var item = "<li>" + "<a href=" + href + ">" + obj.value.items[i].title + "</a> </li>";

document.write(item);

}

document.write('</ul>');

}

</script>

<script src="http://pipes.yahoo.com/pipes/pipe.run?_render=json&_callback=pipeCallback&_id=a7d3195528df5e96181a3d2712266226&url=http%3A%2F%2FNAMABLOGANDA.blogspot.com&num=10" type="text/javascript"></script> <p>

</div>

</div>


<div class="Page">

<div class="Pad"> <p>
<script type="text/javascript">


function pipeCallback(obj) {


document.write("<ol>");


var i;


for (i = 0; i < obj.count ; i++)


{


var href = "'" + obj.value.items[i].link + "'";


var item = "<li>" + "<a href=" + href + ">" + obj.value.items[i].title + "</a> </li>";


document.write(item);


}


document.write("</ol>");


}


</script>


<script src= "http://pipes.yahoo.com/pipes/pipe.run?_render=json&_callback=pipeCallback&


_id=c92ac21897d8b56e61cfa85930dd89a1&url=http%3A%2F%2FNAMABLOGANDA.blogspot.com&num=10" type="text/javascript"></script>
</div>

</div>


<div class="Page">

<div class="Pad">

<script type="text/javascript">

function pipeCallback(obj) {

document.write('<ul style="text-transform: capitalize;">');

var i;

for (i = 0; i < obj.count ; i++)

{

var href = "'" + obj.value.items[i].link + "'";

var item = "<li>" + "<a href=" + href + ">" + obj.value.items[i].title + "</a> </li>";

document.write(item);

}

document.write('</ul>');

}

</script> <script src="http://pipes.yahoo.com/pipes/pipe.run?_render=json&_callback=pipeCallback&_id=0fa4b52819e930cfa76ab4323eb17f99&url=http%3A%2F%2FNAMABLOGANDA.blogspot.com&num=10" type="text/javascript"></script> <p>

</div>

</div>


</div>

</div>

</form>


<script type="text/javascript">

tabview_initialize('TabView');

</script>

Perhatian !!! Anda perlu menggantikan kod berwarna biru kepada nama blog anda dan untuk mengubah saiz atau tajuk tab view.

11. Setelah selesai Save dan view blog untuk melihat hasilnya.

12. Selamat Mencuba.

READ MORE...

Memasang 'Page Peel Social Bookmark'.

Tips Dan Tricks Blogspot

Sekiranya anda ingin memasang 'Sexy Social Bookmark' Klik di sini atau 'Classic Social Bookmark Klik di sini.

Untuk memasang 'Page Peel Social Bookmark' seperti screenshot di atas, sila ikuti beberapa langkah mudah di bawah.

1. Sign in akaun blogger anda.

2. Pilih LAYOUT --> EDIT HTML.

3. BACKUP TEMPLATE anda dahulu untuk mengelakkan sebarang masalah.

4. Klik pada EXPAND WIDGET TEMPLATE seperti screenshot di bawah ini.

Malaysia Blogger Hack

5. Cari kod ini.

]]></b:skin>

6. Copy kod di bawah dan letakkan di atas kod tadi.

<style type='text/css'>

<!--

.expand-down {

font-family:Arial, Helvetica, sans-serif;

line-height:normal;

margin-top:20px;

height:54px;

width:500px;

background: url('http://img34.imageshack.us/img34/4388/socialbookmarkandshare.gif') no-repeat;

margin-bottom:30px;

}

/* reset margins and paddings */

.expand-down * {

margin: 0;

padding: 0;

}

.expand-down ul {

padding-top:25px;

margin-left:10px;

}

.expand-down ul li {

float:left;

list-style-type:none;

}

.expand-down ul li a {

text-decoration:none;

}

.expand-down ul li a img {

width:50px; /* initial width of images, 50% of width */

height:50px; /* initial height of images, 50% of height */

border:none;

}

/* initially, don't show the label inside <span> tag */

.expand-down ul li a span {

display:none;

}

.expand-down ul li:hover a span {

/* show label on mouse hover */

display:block;

font-size:14px;

text-align:center;

color:#000;

}

/* expand the image to 100% on mouse hover.

** an image becomes active when mouse hovers it

** ideally, the image should have same width and height as below

*/

.expand-down ul li:hover a img {

width:100px;

height:100px;

}

/* expand the image next to the right of the active image to 60% using + selector */

.expand-down ul li:hover + li a img {

width:60px;

height:60px;

}

/* expand the image second to the right of the active image to 55% using + selectors */

.expand-down ul li:hover + li + li a img {

width:55px;

height:55px;

}

-->

</style>

7. Sekarang cari kod ini.

<div class='post-footer-line post-footer-line-3'/>

8. Copy kod di bawah dan letakkan di bawah kod tadi.


<div class='expand-down'>

<ul>

<li>

<a href='http://www.facebook.com/share.php'>

<!-- the image -->

<img src='https://blogger.googleusercontent.com/img/b/R29vZ2xl/AVvXsEh2ZpVBX_ImMvyKiXQZnqF9-oWF_DNIhp4ZzfSWsf1fLu_hCv3ObWHK-KHTTZOcSvJjC5KQsApkb98w-e-TpPBh9W9iLxUteMkoIpJ3KSiqclX2hpRb0r80WCSixyWkdY1vu2onuWi7uh6J/s400/facebook_64x64.png'/>

<!-- the label -->

<span>Facebook</span>

</a>

</li>

<!-- make copies of <li>...</li> block to create more items ... --><li><a href='http://twitter.com/home'>

<!-- the image -->

<img src='https://blogger.googleusercontent.com/img/b/R29vZ2xl/AVvXsEixS0VOFrn_BLIcOoFwjhTGe0MqLLARrCVGJcKJmErD3niYFlXMZHeMBcAXYTJRhDWkI9QYBxJGuxAsPYG6VPsGsHVycP0jag2GvWJMULf0fYf2PEupT0aV1dqHQkaGBY8mls26Gm-Q1xLI/s400/twitter_64x64.png'/>

<!-- the label -->

<span>Twitter</span>

</a>

</li><li><a href='http://technorati.com/faves'>

<!-- the image -->

<img src='https://blogger.googleusercontent.com/img/b/R29vZ2xl/AVvXsEjNlyZizGGQQN-iuv49DEm6pur_Ytf6MKe4ucwMbjzRHGPSh4m1g-_1J24XXQje3jChybAMWzfowbuEvVaD9PTMCQ0sjyAhWb95foIYqTixOY8TYc6nTplKWpJihjBcZvgI7tJw0GKLOIbN/s400/technorati_64x64.png'/>

<!-- the label -->

<span>Technorati</span>

</a></li><li><a href='http://feeds2.feedburner.com/syamzone'>

<!-- the image -->

<img src='https://blogger.googleusercontent.com/img/b/R29vZ2xl/AVvXsEhvEX4qTadQYuxjI0pj-R6NnWmD9gu3nG4etn-gERUUjQCW0X8ukcvvkUoa8WJyN6n2yvm3Nac-B6thQfzcPlnJSHupDdlI047ETVlgRkSf2Jf9CMrfB3HHz286QuPkuFYPb5aP8ZtN72ZA/s400/rss_64x64.png'/>

<!-- the label -->

<span>Rss</span>

</a></li><li><a href='http://www.mybloglog.com/buzz/community/bloguntukaku'>

<!-- the image -->

<img src='https://blogger.googleusercontent.com/img/b/R29vZ2xl/AVvXsEg8tdlDTPeR_ukrKzZ0jnisnk1S9e-AfnLjGmX2GTxDU9tmqRFAhe26JXlp2bP2EGkSS9XpAU_H2duxZWnwwny2PwE6FFlV8OF-Mjzz3koAT_P-sPGmGMJtwEe9N8L4tJ36U4gRFdMiLg66/s400/yahoo_64x64.png'/>

<!-- the label -->

<span>MyBlogLog</span>

</a></li> <li>

<a href='http://www.google.com/bookmarks/mark'>

<!-- the image -->

<img src='https://blogger.googleusercontent.com/img/b/R29vZ2xl/AVvXsEgC3tCAMwzbc9aiStw1e5lPGCKZ5XSvjK1DZJ8O7S-tgMToLEm3o58qdCJhN96sJEU4HQbqONrY8San2c_gcjrlHMiNZbwYMcFC8wuBZmQH973ZIn_LhAZBN9GMCleDooSrojE7mOo08c29/s400/google_64x64.png'/>

<!-- the label -->

<span>Google</span>

</a>

</li><li>

<a href='http://negaraku.net/faves'>

<!-- the image -->

<img src='https://blogger.googleusercontent.com/img/b/R29vZ2xl/AVvXsEiFocYtM-vsf26jhPywf3AtDUZB9UF7gJ4NIuC5ZDQU6w0769C5eMvmYosskyHGXacR8J3wAXXLFSzCAkwfM25iZ_lz0MuYGNUywzSlMNv2WgPGwLtG4qRBwA1m4Ga88QaqxO35-Pozqq6n/s400/SyamZone-Flag-Icon.png'/>

<!-- the label -->

<span>Negaraku.Net</span>

</a>

</li>

</ul>

</div>

Perhatian !!! Gantikan text / kod berwarna merah.

9. Pilih PREVIEW untuk melihat hasilnya.

10. Sekiranya anda berpuas hati SAVE TEMPLATE.

Sumber asal SyamZone™

READ MORE...

Memasang 'Footer NavBar'.


1. Sign in akaun blogger anda.

2. Pilih LAYOUT --> EDIT HTML.

3. BACKUP TEMPLATE anda dahulu untuk mengelakkan sebarang masalah.

4. Klik pada EXPAND WIDGET TEMPLATE seperti screenshot di bawah ini.

Panduan Percuma Untuk Blogspot

5. Cari kod ini.

]]></b:skin>

6. Copy kod di bawah dan letakkan di atas kod tadi.


#navbar-footer p.info {

float: right;

padding-right:40px;

line-height: 1.2;

height: 100%;

vertical-align: bottom;

}


#navbar-footer p {

float: left;

margin: 0px;

padding-top:4px;

padding-left:40px;

vertical-align: bottom;

line-height: 1.2;

}


#navbar-footer a {

color: #333;

}


#navbar-footer {

align: center;

position: fixed;

border-top: 1px solid #ddd;

border-bottom: 10px solid #f5f5f5;

background-color: #f5f5f5;

width: 100%;

left: 0px;

text-align: left;

color: #888;

font-family: Verdana;

font-size: 11px;

z-index:10000;

opacity: 0.9;

filter: alpha(opacity: 90);

bottom:0;

}


7. Cari kod ini.

</body>

8. Kemudian Copy kod di bawah dan letakkan di atas kod tadi.

<div id="navbar-footer">

<p>

<img height='30' src="http://URLPHOTOANDA.JPG"/>&#160;&#160;<a href="http://NAMABLOGANDA.blogspot.com/index.html">SyamZone™</a>&#160;&#169;&#160;2008-2009 </p>

<p class="info">Powered by <a href="http://www.blogger.com">Blogger</a> | Created and Maintained by <a href="http://www.twitter.com/syamzone" target="_blank">SyamZone™</a><br/>Best viewed in Firefox 1.5+ at 1024x768 or higher resolution

<br/>

</p>

</div>

Perhatian !!! Gantikan text/kod yang berwarna merah.

9. Untuk melihat hasilnya pilih PREVIEW.

10. Sekiranya anda berpuas hati SAVE TEMPLATE.

Sumber Anang's Blog..

READ MORE...

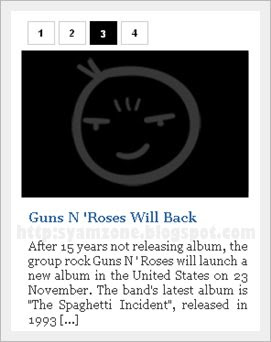
Memasang 'Slide Show Tab View Menu'.


Sekiranya anda ingin memasang 'Slide Show Tab View Menu' seperti screenshot di atas.

Untuk melihat demo slideshow klik di sini.

Sila ikuti beberapa langkah mudah di bawah.

1. Sign in akaun blogger anda.

2. Pilih LAYOUT --> EDIT HTML.

3. BACKUP TEMPLATE anda dahulu untuk mengelakkan sebarang masalah.

4. Klik pada EXPAND WIDGET TEMPLATE seperti screenshot di bawah ini.

Malaysia Blogger Hack

5. Cari kod ini.

]]></b:skin>

6. Copy kod di bawah dan letakkan di atas kod tadi.

.indentmenu{

font: bold 11px Arial;

width: 100%; /*leave this value as is in most cases*/


}


.indentmenu ul{

margin: 2px;

padding: 0;

float: left;

/* width: 80%; width of menu*/

background: transparent;

}


.indentmenu ul li{

display: inline;

}


.indentmenu ul li a{

float: left;

margin: 2px;

color: #000; /*text color*/

padding: 5px 11px;

text-decoration: none;

border: 1px solid #ccc;

}


.indentmenu ul li a:hover{

background:#ddd;

}


.indentmenu ul li a:visited{

color: white;

}


.indentmenu ul li a.selected{

color: white !important;

padding-top: 6px; /*shift text down 1px*/

padding-bottom: 4px;

border: 1px solid #000000;

background:#000000;

}


.tabcontentstyle{ /*style of tab content container*/

border: 1px solid gray;

width: 450px;

margin-bottom: 1em;

padding: 10px;

}


.tabcontent{

display:none;

}


@media print {

.tabcontent {

display:block !important;

}

}


7. Cari kod ini.


</head>

8. Copy kod di bawah dan letakkan di atas kod tadi.


<script type='text/javascript'>

//<![CDATA[

//** Tab Content script v2.0- © Dynamic Drive DHTML code library (http://www.dynamicdrive.com)

//** Updated Oct 7th, 07 to version 2.0. Contains numerous improvements:

// -Added Auto Mode: Script auto rotates the tabs based on an interval, until a tab is explicitly selected

// -Ability to expand/contract arbitrary DIVs on the page as the tabbed content is expanded/ contracted

// -Ability to dynamically select a tab either based on its position within its peers, or its ID attribute (give the target tab one 1st)

// -Ability to set where the CSS classname "selected" get assigned- either to the target tab's link ("A"), or its parent container

//** Updated Feb 18th, 08 to version 2.1: Adds a "tabinstance.cycleit(dir)" method to cycle forward or backward between tabs dynamically

//** Updated April 8th, 08 to version 2.2: Adds support for expanding a tab using a URL parameter (ie: http://mysite.com/tabcontent.htm?tabinterfaceid=0)


////NO NEED TO EDIT BELOW////////////////////////


function ddtabcontent(tabinterfaceid){

this.tabinterfaceid=tabinterfaceid //ID of Tab Menu main container

this.tabs=document.getElementById(tabinterfaceid).getElementsByTagName("a") //Get all tab links within container

this.enabletabpersistence=true

this.hottabspositions=[] //Array to store position of tabs that have a "rel" attr defined, relative to all tab links, within container

this.currentTabIndex=0 //Index of currently selected hot tab (tab with sub content) within hottabspositions[] array

this.subcontentids=[] //Array to store ids of the sub contents ("rel" attr values)

this.revcontentids=[] //Array to store ids of arbitrary contents to expand/contact as well ("rev" attr values)

this.selectedClassTarget="link" //keyword to indicate which target element to assign "selected" CSS class ("linkparent" or "link")

}


ddtabcontent.getCookie=function(Name){

var re=new RegExp(Name+"=[^;]+", "i"); //construct RE to search for target name/value pair

if (document.cookie.match(re)) //if cookie found

return document.cookie.match(re)[0].split("=")[1] //return its value

return ""

}


ddtabcontent.setCookie=function(name, value){

document.cookie = name+"="+value+";path=/" //cookie value is domain wide (path=/)

}


ddtabcontent.prototype={


expandit:function(tabid_or_position){ //PUBLIC function to select a tab either by its ID or position(int) within its peers

this.cancelautorun() //stop auto cycling of tabs (if running)

var tabref=""

try{

if (typeof tabid_or_position=="string" && document.getElementById(tabid_or_position).getAttribute("rel")) //if specified tab contains "rel" attr

tabref=document.getElementById(tabid_or_position)

else if (parseInt(tabid_or_position)!=NaN && this.tabs[tabid_or_position].getAttribute("rel")) //if specified tab contains "rel" attr

tabref=this.tabs[tabid_or_position]

}

catch(err){alert("Invalid Tab ID or position entered!")}

if (tabref!="") //if a valid tab is found based on function parameter

this.expandtab(tabref) //expand this tab

},


cycleit:function(dir, autorun){ //PUBLIC function to move foward or backwards through each hot tab (tabinstance.cycleit('foward/back') )

if (dir=="next"){

var currentTabIndex=(this.currentTabIndex<this.hottabspositions.length-1)? this.currentTabIndex+1 : 0

}

else if (dir=="prev"){

var currentTabIndex=(this.currentTabIndex>0)? this.currentTabIndex-1 : this.hottabspositions.length-1

}

if (typeof autorun=="undefined") //if cycleit() is being called by user, versus autorun() function

this.cancelautorun() //stop auto cycling of tabs (if running)

this.expandtab(this.tabs[this.hottabspositions[currentTabIndex]])

},


setpersist:function(bool){ //PUBLIC function to toggle persistence feature

this.enabletabpersistence=bool

},


setselectedClassTarget:function(objstr){ //PUBLIC function to set which target element to assign "selected" CSS class ("linkparent" or "link")

this.selectedClassTarget=objstr || "link"

},


getselectedClassTarget:function(tabref){ //Returns target element to assign "selected" CSS class to

return (this.selectedClassTarget==("linkparent".toLowerCase()))? tabref.parentNode : tabref

},


urlparamselect:function(tabinterfaceid){

var result=window.location.search.match(new RegExp(tabinterfaceid+"=(\\d+)", "i")) //check for "?tabinterfaceid=2" in URL

return (result==null)? null : parseInt(RegExp.$1) //returns null or index, where index (int) is the selected tab's index

},


expandtab:function(tabref){

var subcontentid=tabref.getAttribute("rel") //Get id of subcontent to expand

//Get "rev" attr as a string of IDs in the format ",john,george,trey,etc," to easily search through

var associatedrevids=(tabref.getAttribute("rev"))? ","+tabref.getAttribute("rev").replace(/\s+/, "")+"," : ""

this.expandsubcontent(subcontentid)

this.expandrevcontent(associatedrevids)

for (var i=0; i<this.tabs.length; i++){ //Loop through all tabs, and assign only the selected tab the CSS class "selected"

this.getselectedClassTarget(this.tabs[i]).className=(this.tabs[i].getAttribute("rel")==subcontentid)? "selected" : ""

}

if (this.enabletabpersistence) //if persistence enabled, save selected tab position(int) relative to its peers

ddtabcontent.setCookie(this.tabinterfaceid, tabref.tabposition)

this.setcurrenttabindex(tabref.tabposition) //remember position of selected tab within hottabspositions[] array

},


expandsubcontent:function(subcontentid){

for (var i=0; i<this.subcontentids.length; i++){

var subcontent=document.getElementById(this.subcontentids[i]) //cache current subcontent obj (in for loop)

subcontent.style.display=(subcontent.id==subcontentid)? "block" : "none" //"show" or hide sub content based on matching id attr value

}

},


expandrevcontent:function(associatedrevids){

var allrevids=this.revcontentids

for (var i=0; i<allrevids.length; i++){ //Loop through rev attributes for all tabs in this tab interface

//if any values stored within associatedrevids matches one within allrevids, expand that DIV, otherwise, contract it

document.getElementById(allrevids[i]).style.display=(associatedrevids.indexOf(","+allrevids[i]+",")!=-1)? "block" : "none"

}

},


setcurrenttabindex:function(tabposition){ //store current position of tab (within hottabspositions[] array)

for (var i=0; i<this.hottabspositions.length; i++){

if (tabposition==this.hottabspositions[i]){

this.currentTabIndex=i

break

}

}

},


autorun:function(){ //function to auto cycle through and select tabs based on a set interval

this.cycleit('next', true)

},


cancelautorun:function(){

if (typeof this.autoruntimer!="undefined")

clearInterval(this.autoruntimer)

},


init:function(automodeperiod){

var persistedtab=ddtabcontent.getCookie(this.tabinterfaceid) //get position of persisted tab (applicable if persistence is enabled)

var selectedtab=-1 //Currently selected tab index (-1 meaning none)

var selectedtabfromurl=this.urlparamselect(this.tabinterfaceid) //returns null or index from: tabcontent.htm?tabinterfaceid=index

this.automodeperiod=automodeperiod || 0

for (var i=0; i<this.tabs.length; i++){

this.tabs[i].tabposition=i //remember position of tab relative to its peers

if (this.tabs[i].getAttribute("rel")){

var tabinstance=this

this.hottabspositions[this.hottabspositions.length]=i //store position of "hot" tab ("rel" attr defined) relative to its peers

this.subcontentids[this.subcontentids.length]=this.tabs[i].getAttribute("rel") //store id of sub content ("rel" attr value)

this.tabs[i].onclick=function(){

tabinstance.expandtab(this)

tabinstance.cancelautorun() //stop auto cycling of tabs (if running)

return false

}

if (this.tabs[i].getAttribute("rev")){ //if "rev" attr defined, store each value within "rev" as an array element

this.revcontentids=this.revcontentids.concat(this.tabs[i].getAttribute("rev").split(/\s*,\s*/))

}

if (selectedtabfromurl==i || this.enabletabpersistence && selectedtab==-1 && parseInt(persistedtab)==i || !this.enabletabpersistence && selectedtab==-1 && this.getselectedClassTarget(this.tabs[i]).className=="selected"){

selectedtab=i //Selected tab index, if found

}

}

} //END for loop

if (selectedtab!=-1) //if a valid default selected tab index is found

this.expandtab(this.tabs[selectedtab]) //expand selected tab (either from URL parameter, persistent feature, or class="selected" class)

else //if no valid default selected index found

this.expandtab(this.tabs[this.hottabspositions[0]]) //Just select first tab that contains a "rel" attr

if (parseInt(this.automodeperiod)>500 && this.hottabspositions.length>1){

this.autoruntimer=setInterval(function(){tabinstance.autorun()}, this.automodeperiod)

}

} //END int() function


} //END Prototype assignment


//]]>

</script>


9. Sekarang SAVE TEMPLATE anda.

10. Kemudian pilih 'Layout'--> 'Add a Gadget'--> 'Html / Javascript'.

11. Copy kod di bawah dan Paste.

<div style="float:left;margin:0px 10px 0px 0px;padding:0px;height:350px;">


<div id="pettabs" class="indentmenu">


<ul>


<li><a href="#" class="selected" rel="tab1">1</a></li>


<li><a href="#" rel="tab2">2</a></li>


<li><a href="#" rel="tab3">3</a></li>


<li><a href="#" rel="tab4">4</a></li>


</ul>


<br style="clear: left"/>


</div>


<div style="width:240px;text-align:justify;padding: 5px; margin-bottom:1em">


<div id="tab1" class="tabcontent">


<a href="http://magazine-1.blogspot.com/2008/11/obama-will-change-bush-policy.html">


<img border="0" style="border-right: 0px; border-top: 0px; border-left: 0px; border-bottom: 0px" alt="obamabush" width="240" src="http://lh3.ggpht.com/_pt7i0nbIOCY/SSS44BOiVbI/AAAAAAAAAZ8/JSAjyxXZVEc/obamabush_thumb%5B1%5D.png?imgmax=800" height="152" title="obamabush"/></a>


<p><h3><a href="http://magazine-1.blogspot.com/2008/11/obama-will-change-bush-policy.html">Obama Will Change Busf Policy</a></h3></p>


U.S. President Barack Obama will change several numbers of controversial policies by President George W. Bush, including the restriction of the parent embryo cell research [...]


</div>


<div id="tab2" class="tabcontent">


<a href="http://magazine-1.blogspot.com/2008/11/beyonce-will-never-sell-her-wedding.html">


<img border="0" style="border-right: 0px; border-top: 0px; border-left: 0px; border-bottom: 0px" alt="beyonce" width="240" src="http://lh4.ggpht.com/_pt7i0nbIOCY/SSS47jWx8HI/AAAAAAAAAaE/wTj2qMO6dV8/beyone_thumb%5B1%5D.png?imgmax=800" height="152" title="beyonce"/></a>


<p><h3><a href="http://magazine-1.blogspot.com/2008/11/beyonce-will-never-sell-her-wedding.html">Beyonce Will Never Sell Her Wedding Photo</a></h3></p>


Beyonce said, she will never consider to sells her wedding photo with Jay-Z to a celebrity magazine that offering a large amount of money as rewards, even she wonder with the amount of money that offered to her [...]


</div>


<div id="tab3" class="tabcontent">


<a href="http://magazine-1.blogspot.com/2008/11/guns-n-roses-will-back.html">


<img border="0" style="border-right: 0px; border-top: 0px; border-left: 0px; border-bottom: 0px" alt="Guns N 'Roses" width="240" src="http://lh6.ggpht.com/_pt7i0nbIOCY/SSS5Gg8b_8I/AAAAAAAAAac/OdWejtZv8GI/gunNroses_thumb%5B1%5D.png?imgmax=800" height="152" title="Guns N 'Roses"/></a>


<p><h3><a href="http://magazine-1.blogspot.com/2008/11/guns-n-roses-will-back.html">Guns N 'Roses Will Back</a></h3></p>


After 15 years not releasing album, the group rock Guns N ' Roses will launch a new album in the United States on 23 November. The band's latest album is "The Spaghetti Incident", released in 1993 [...]


</div>


<div id="tab4" class="tabcontent">

<a href="http://magazine-1.blogspot.com/2008/11/i-pod-can-make-your-ear-buzz.html">


<img border="0" style="border-right: 0px; border-top: 0px; border-left: 0px; border-bottom: 0px" alt="ipod" width="240" src="https://blogger.googleusercontent.com/img/b/R29vZ2xl/AVvXsEizCL1qwVCDsy9YHt9LT3zXQb_TCoOufH8YYA4yTqQfJXO2kLqnPqWWXt3eB_06huOzCT5LcbHB3DW6tA7PCYLutc5lplfvKpNruH68ff62HBA4qx0OhPkSol0vhH_fYxr2eIQkHNzNF4o/?imgmax=800" height="152" title="ipod"/></a>


<p><h3><a href="http://magazine-1.blogspot.com/2008/11/i-pod-can-make-your-ear-buzz.html">Ipod Can Make Your ear Buzz</a></h3></p>


Music is one way to wake the spirit, to create happy life, but what happens if the music makes the ears buzz? of course, not the music that makes the ear 'buzzy',[...]


</div>

</div>


<script type="text/javascript">


var mypets=new ddtabcontent("pettabs")

mypets.setpersist(true)

mypets.setselectedClassTarget("link")

mypets.init(2000)


</script>

Perhatian !!! Gantikan text dan URL berwarna merah.

12. SAVE.

13. Selamat Mencuba.

Sumber Blogspot Tutorial.

READ MORE...

Memasang 'Alert Message'.


Untuk memasang 'alert message' seperti screenshot di atas.

Sila ikuti langkah mudah di bawah.

1. Mula-mula masuk akaun blogger anda.

2. Pilih 'Layout'-->'Edit Html'-->'Expand Widget Template'.

3. Ok,sekarang anda cari kod di bawah ini:


]]></b:skin>

4. Kemudian copy kod di bawah, dan paste di atas kod tadi !!!

5. 'Save template'


.alert {

background: #fff6bf url(http://tinyurl.com/n43yya) center no-repeat;

background-position: 15px 50%; /* x-pos y-pos */

text-align: left;

padding: 5px 20px 5px 45px;

border-top: 2px solid #ffd324;

border-bottom: 2px solid #ffd324;

}

6. Sekarang sampailah ke peringkat yang terakhir.

7. Pergi ke 'Setting'-->'Formatting'-->'Post Template'.

8. Copy kod di bawah ini dan Paste :

<p class="alert">Tuliskan Message Anda Di Sini...</p>

9. 'Save Setting'

10. Pastikan setiap kali anda hendak membuat post baru text ini akan muncul 'Tuliskan Message Anda Di Sini...' dan gantikan text tersebut dengan message anda.

Anda boleh kod berwarna merah 'background: #fff6bf dan border-top: 2px solid #ffd324;, border-bottom: 2px solid #ffd324;' mengikut warna pilihan anda.

Sumber Bioneural.net.

READ MORE...

Memasang 'Stripe Ad'.


Kepada yang belum mengetahui apa itu Stripe Ad ? Gambarannya adalah seperti screenshot di atas.

Sekiranya anda mahu memasang Stripe Ad ini di bahagian atas blog ? Sila ikuti beberapa langkah mudah di bawah.

1. Sign in akaun blogger anda.

2. Pilih LAYOUT --> EDIT HTML.

3. BACKUP TEMPLATE anda dahulu untuk mengelakkan sebarang masalah.

4. Klik pada EXPAND WIDGET TEMPLATE seperti screenshot di bawah ini.

Malaysia Blogger Hack

5. Cari kod ini.

]]></b:skin>

6. Copy kod di bawah dan letakkan di atas kod tadi.


#mta_bar { background: #003366; border-bottom:3px solid #6699ff; margin: 0 0 3px 0; padding: 4px 0; z-index: 100; top: 0; left: 0; width: 100%; overflow: auto; position: fixed; }

* html #mta_bar{

/*IE6 hack*/

position: absolute;

width: expression(document.compatMode=="CSS1Compat"? document.documentElement.clientWidth+"px" : body.clientWidth+"px");

}

#mta_bar .left { float: left; text-align: center; font-family: Arial; font-size: 13px; font-weight: bold; font-style: normal; color: #0000FF; width:92%;}

#mta_bar .right {font-family: Arial, Helvetica, sans-serif; float: right; text-align: center; font-weight: normal; font-size: 10px;letter-spacing: 0; width: 30px; white-space: nowrap;}

#mta_bar .right a {font-size: 10px; color: #0000FF; text-decoration: underline;}

#mta_bar .right a:hover {font-size: 10px; color: #0000FF; text-decoration: none;}

#left_bar a {background: url('http://lh4.ggpht.com/_pt7i0nbIOCY/SRtNzbvDqPI/AAAAAAAAAXk/KxbvrpJ1DE4/ico-rss-trans_thumb%5B1%5D.png?imgmax=800') no-repeat; text-decoration: none; color: #fff; padding:5px 0px 5px 30px;}

#left_bar a:hover { text-decoration: underline; color: #fff; }

7. Cari kod ini.

</head>

8. Copy kod di bawah dan letakkan di atas kod tadi.

<script type='text/javascript'>

//<![CDATA[

var mta_arr = new Array();

var mta_clear = new Array();

function mtaFloat(mta) {

mta_arr[mta_arr.length] = this;

var mtapointer = eval(mta_arr.length-1);

this.pagetop = 0;

this.cmode = (document.compatMode && document.compatMode!="BackCompat") ? document.documentElement : document.body;

this.mtasrc = document.all? document.all[mta] : document.getElementById(mta);

this.mtasrc.height = this.mtasrc.offsetHeight;

this.mtaheight = this.cmode.clientHeight;

this.mtaoffset = mtaGetOffsetY(mta_arr[mtapointer]);

var mtabar = 'mta_clear['+mtapointer+'] = setInterval("mtaFloatInit(mta_arr['+mtapointer+'])",1);';

mtabar = mtabar;

eval(mtabar);

}

function mtaGetOffsetY(mta) {

var mtaTotOffset = parseInt(mta.mtasrc.offsetTop);

var parentOffset = mta.mtasrc.offsetParent;

while ( parentOffset != null ) {

mtaTotOffset += parentOffset.offsetTop;

parentOffset = parentOffset.offsetParent;

}

return mtaTotOffset;

}

function mtaFloatInit(mta) {

mta.pagetop = mta.cmode.scrollTop;

mta.mtasrc.style.top = mta.pagetop - mta.mtaoffset + "px";

}

function closeTopAds() {

document.getElementById("mta_bar").style.visibility = "hidden";

}

//]]>

</script>

9. Sekarang cari kod ini.

</body>

10. Kemudian Copy kod di bawah dan letakkan di atas kod tadi.

<div id='mta_bar'>

<div id='left_bar'><span class='left'><a href='http://feeds.feedburner.com/syamzone' target='_blank'>More than 300 have subcribed in readers, have you?</a></span></div>

<span class='right' onmouseout='self.status=&apos;&apos;' onmouseover='self.status=&apos;syamzone.blogspot.com&apos;;return true;'> <img align='absmiddle' border='0' onClick='closeTopAds();return false;' src='http://lh5.ggpht.com/_pt7i0nbIOCY/SRGg-N2bQ4I/AAAAAAAAAVE/pG-pTLXsMtc/close_thumb%5B1%5D.png?imgmax=800' style='cursor:hand;cursor:pointer;'/></span></div>

11. Untuk melihat hasilnya pilih PREVIEW.

12. Sekiranya anda berpuas hati SAVE TEMPLATE.

Perhatian !!! Gantikan text/kod yang berwarna merah.

Sumber Blogspot Tutorial, MaxBlogPress.

READ MORE...

Memasang 'Slider Ala Zinmag Primus'.

SyamZone™ Slider Ala Zinmag Primus

Memasang 'Slider Ala Zinmag Primus Template'

1. Sign in akaun blogger anda.

2. Pilih LAYOUT --> EDIT HTML.

3. BACKUP TEMPLATE anda dahulu untuk mengelakkan sebarang masalah.

4. Klik pada EXPAND WIDGET TEMPLATE seperti screenshot di bawah ini.

Malaysia Blogger Hack

5. Cari kod ini.

]]></b:skin>

6. Copy kod di bawah dan letakkan di atas kod tadi.


#slider {


background:url(http://img99.imageshack.us/img99/9594/slide.png);


height: 254px;


overflow: hidden;


position: relative;


margin: 5px 0;


}


#mover {


width: auto;


position:absolute;


overflow:hidden;


}


.slide {


padding: 20px 0px;


width: 1000px;


float: left;


position: relative;


height:200px;


}


.slide h2 {


font-family:georgia, Helvetica, Sans-Serif;


font-size: 24px;


color: #ac0000;


padding:0px 0px 0px 30px;


margin:0px 0px;


width:500px;


overflow:hidden;


}


.slide h2 a:link, .slide h2 a:visited {


color:#fff;


background-color: transparent;


}


.slide h2 a:hover {


color: #ddd;


background-color: transparent;


}


span.slmet {


color: #ee0909;


font-size: 10px;


font-family:Tahoma, georgia, Helvetica, Sans-Serif;


line-height: 20px;


width: 500px;


padding:0px 0px 0px 30px;


margin:0px 0px;


text-transform:uppercase;


}


.slide p {


color: #999;


font-size: 12px;


font-family:georgia, Helvetica, Sans-Serif;


line-height: 20px;


width: 500px;


padding:0px 0px 0px 30px;


margin:0px 0px;


}


.slide img {


position: absolute;


top: 20px;


left: 577px;


background:#fff;


padding:10px 10px;


}


#slider-stopper {


position: absolute;


font-family: Georgia, Helvetica, Sans-Serif;


top: 113px;


right: 65px;


color: #AC0000;


padding: 3px 8px;


font-size: 14px;


text-transform: uppercase;


z-index: 1000;


}


7. Cari kod ini sekali lagi.

]]></b:skin>

8. Copy kod di bawah dan letakkan di bawah kod tadi.

<script src='http://bloggerstyles.com/data/templates/000/Zinmag-Primus/js/jquery-1.2.6.min.js' type='text/javascript'/>


<script src='http://bloggerstyles.com/data/templates/000/Zinmag-Primus/js/slider.js' type='text/javascript'/>


<script type="text/javascript"><!--//--><![CDATA[//><!--


sfHover = function() {


var sfEls = document.getElementById("catmenu").getElementsByTagName("LI");


for (var i=0; i<sfEls.length; i++) {


sfEls[i].onmouseover=function() {


this.className+=" sfhover";


}


sfEls[i].onmouseout=function() {


this.className=this.className.replace(new RegExp(" sfhover\\b"), "");


}


}


}


if (window.attachEvent) window.attachEvent("onload", sfHover);


//--><!]]></script>

9. Cari kod ini.

<div id='header-wrapper'>


..........


.........


</b:section>


10. Langkah terakhir copy kod di bawah dan letakkan di bawah kod tadi.

<!-- Casing -->


<div id='casing'>


<!-- Slider -->


<div id='slider'>


<div id='mover'>


<div class='slide'>


<h2><a href='http://syamzone-bloguntukaku.blogspot.com/search/label/tok%20wan%20aku%20memang%20blues'>Tok Wan Aku Memang Blues.</a></h2>


<p>29/4/2009.....Ari ni seperti biasa aku melakukan aktiviti bulanan iaitu melakukan marathon untuk mengupdate kepala otak aku dengan perkembangan atau perubahan yang berlaku di sekitar Kuala Lumpur dan Selangor.... Biasanya aku buat aktiviti bulanan ni naik motor atau kereta ....Tapi semalam saja nak try buat perubahan naik Monorel, LRT, Putra dan Komuter.....Mungkin aktiviti yang aku buat ni macam tak berfaedah....</p>


<img height='140' src='https://blogger.googleusercontent.com/img/b/R29vZ2xl/AVvXsEhC6EVd3QGYAeiPGQtL5DY22b34QDCao9DauSDtPEoohBJNf9xBmutgEu5n-TYVQAVgmVX3OUl8fM5yr8sX3EHKN_rCa9S2vj1CRD_hAtwYAvo66QKEkLwyaT-Rl8d19LQHSQrvF5y4g7XO/s320/leon-mandrake-magician.jpg' width='200'/>


</div> <div class='slide'>


<h2><a href='http://syamzone-bloguntukaku.blogspot.com/search/label/young%20and%20dangerous'>Young And Dangerous.</a></h2>


<p>Selepas lebih kurang 2 jam melepak dekat kedai mamak di sulami dengan sembang-menyembang yg agak merapu dan tidak berfaedah,aku dan beberapa org teman-temanku mula berasa bosan dan sedar bahawa perkara yg kami lakukan itu tidak berfaedah dan sama-sekali tidak bermanafaat langsung...Kami mula bertukar-tukar idea dan pendapat tentang ke mana arah tuju seterusnya,setelah mendapat persetujuan dari semua pihak kami semua bersepakat untuk pergi ke Uptown Damansara Utama (Uptown lama dh x de pun sekarang....</p>


<img height='140' src='https://blogger.googleusercontent.com/img/b/R29vZ2xl/AVvXsEjYC7vpflCX0yLePFHWmiIAH_eH7icebAkvd9nh4-eDWupQzs7TNngU828mvViDEfnWZh5szneszSC4xRbOL15DqTggj5t7XLSG-DLxq2sCtRySFIZG8v3NFT_F5XwNWc6c5BWoHhickqvr/s320/LANUN+KOTA.JPG' width='200'/>


</div> </div>


<!-- /Mover -->


</div>


<!-- /Slider -->


</div>


<div class='clear'/>


Perhatian !!! Gantikan text/kod yang berwarna merah.Untuk mengubah saiz image tukarkan text/kod yang berwarna biru.

Sumber LoveYuliana

READ MORE...

Memasang 'Classic Social Bookmark'.

Tips Dan Panduan Percuma Untuk Blogspot

Sekiranya anda ingin memasang 'Sexy Social Bookmark' KLIK DI SINI.

Untuk memasang 'Social Bookmark' seperti screenshot di atas,sila ikuti beberapa langkah mudah di bawah.

1. Sign in akaun blogger anda.

2. Pilih LAYOUT --> EDIT HTML.

3. BACKUP TEMPLATE anda dahulu untuk mengelakkan sebarang masalah.

4. Klik pada EXPAND WIDGET TEMPLATE seperti screenshot di bawah ini.

Malaysia Blogger Hack

5. Cari kod ini.

]]></b:skin>

6. Copy kod di bawah dan letakkan di atas kod tadi.

.rsociales ul {

display:inline;

margin:0pt !important;

padding:0pt !important; }

.rsociales li {

background:transparent none repeat scroll 0%;

display:inline;

list-style-type:none;

margin:0pt;

padding:2px; }

.rsociales img {

border:0pt none;

float:none;

margin:0pt;

padding:0pt; }

.rsociales-sobre { opacity:0.4; }

.rsociales-sobre:hover { opacity:1; }

7. Sekarang cari kod ini.

<div class='post-footer-line post-footer-line-3'/>

8. Copy kod di bawah dan letakkan di bawah kod tadi.


<div class='rsociales'>

<ul>

<li><a expr:href='&quot;http://www.technorati.com/faves?add=&quot; + data:post.url + &quot;&amp;title=&quot; + data:post.title' target='_blank'><img alt='Agregar a Technorati' class='rsociales-sobre' src='https://blogger.googleusercontent.com/img/b/R29vZ2xl/AVvXsEg-Bymx7a5o_sprx6VBxTFmiKxb0pxzaN2ifp9gIQc1w06bO7W5Xx-JomxpU0W4pEK6pYuEU8fPE3zrSZ3cAsVXY_WXEjTUieSIhTjPEcy_VfOrGo8QQ_nXODuazdDtIp8VN8zYjEMqdDw/s1600/technorati.gif'/></a></li>

<li><a expr:href='&quot;http://del.icio.us/post?url=&quot; + data:post.url + &quot;&amp;title=&quot; + data:post.title' target='_blank'><img alt='Agregar a Del.icio.us' class='rsociales-sobre' src='https://blogger.googleusercontent.com/img/b/R29vZ2xl/AVvXsEikne7PabBYpepK_CAiIP5uFGyqc2WHRW5GEmXoYMw_v4J3dRmbN-08S7pOjSwE-mlT5Hci9g71AGCVpokNYxWHVm_LnujXTtDSF5u0nHghsGMcc9WafDhtvcOeNP8l9ki_zV6wU_E2y2Q/s1600/delicious.gif'/></a></li>

<li><a expr:href='&quot;http://digg.com/submit?phase=2&amp;amp;url=&quot; + data:post.url + &quot;&amp;title=&quot; + data:post.title' target='_blank'><img alt='Agregar a DiggIt!' class='rsociales-sobre' src='https://blogger.googleusercontent.com/img/b/R29vZ2xl/AVvXsEgVc9se4xRhWq4elEV534i4WU_s0sSlDTuBdbwsVef6Rk7Mq5PkjfipBfwjHUu2WNi_teJc_N2FOyn_78DOygdR-njINNCgONErQ_hHZ1DQW_SPP6h9NOtwcMXYo07F4tWejxLb40FPX5Q/s1600/digg.png'/></a></li>

<li><a expr:href='&quot;http://myweb2.search.yahoo.com/myresults/bookmarklet?u=&quot; + data:post.url + &quot;&amp;title=&quot; + data:post.title' target='_blank'><img alt='Agregar a Yahoo!' class='rsociales-sobre' src='https://blogger.googleusercontent.com/img/b/R29vZ2xl/AVvXsEiMzjG1JYhHOtKLMkscYBmi243_h0IUWrqzck7OtH5ZmRC7_2-HZyc44N9-hTZGphZbtNEXfIaXky5QcA6acJmmBfELK7SHGJ9PtYpmCj4Oq0jKGycRCLEH-pYIvTTyaMkk-uOsaqEKRho/s1600/yahoo.png'/></a></li>

<li><a expr:href='&quot;http://www.google.com/bookmarks/mark?op=edit&amp;output=popup&amp;bkmk=&quot; + data:post.url + &quot;&amp;title=&quot; + data:post.title' target='_blank'><img alt='Agregar a Google' class='rsociales-sobre' src='https://blogger.googleusercontent.com/img/b/R29vZ2xl/AVvXsEjMpuEYNoBWMyiM-_U6FBa7bC4ZNc7dFkMSrKeOdqs-K7UaWv_qIlh0GZyHwMcE6hAZk8Ula506UXDC5PhubZ5auvCgevHuolAeFe7mStJ5BDkzMgxq-t_P0teXT5_2oqYofKoq1ro8CKI/s1600/google.gif'/></a></li>

<li><a expr:href='&quot;http://meneame.net/submit.php?url=&quot; + data:post.url + &quot;&amp;title=&quot; + data:post.title' target='_blank'><img alt='Agregar a Meneame' class='rsociales-sobre' src='https://blogger.googleusercontent.com/img/b/R29vZ2xl/AVvXsEja0c2Yiwnirm3pM8pOcIQRKIsz61Q_jsiZk56sGGz_XM_Ujch4a-raSpNfo670c7a7EPzELV2kkr0rwACs2LoYjJDUsiec94sFYzqj3Cw97zO0h4ZphQLwKcmAlFOUMplOPNRsxfi3xhw/s1600/meneame.png'/></a></li>

<li><a expr:href='&quot;http://www.furl.net/storeIt.jsp?u=&quot; + data:post.url + &quot;&amp;title=&quot; + data:post.title' target='_blank'><img alt='Agregar a Furl' class='rsociales-sobre' src='https://blogger.googleusercontent.com/img/b/R29vZ2xl/AVvXsEiExJr8UcLB5zk0HTnrDGVBkTVTd4t4bR5UuMoERvIWPvN2Yxws4MOYGcZo3shru9ZPKzRC0r_gYp7s4_MxbUus53OA9JjUCmgUM2xYMgMiDXsqzUXqNKXGII72DXX4C1JzRvuIzSqTc-Y/s1600/furl.png'/></a></li>

<li><a expr:href='&quot;http://reddit.com/submit?url=&quot; + data:post.url + &quot;&amp;title=&quot; + data:post.title' target='_blank'><img alt='Agregar a Reddit' class='rsociales-sobre' src='https://blogger.googleusercontent.com/img/b/R29vZ2xl/AVvXsEhoIVWYTp0rPEmJq7GLDb5M5RUffk3wV0ZWWI4VbfQfN1n7NaWkjxPpLtMb-gUWefHJs3SzcFM1Hz9QHCGMd02Q8YMSBMuzEdtH37Os-Aegtcvib6ikCOTKqlDRUax3I3tr7B3rhDKpLmo/s1600/reddit.gif '/></a></li>

<li><a expr:href='&quot;http://ma.gnolia.com/beta/bookmarklet/add?url=&quot; + data:post.url + &quot;&amp;title=&quot; + data:post.title' target='_blank'><img alt='Agregar a Magnolia' class='rsociales-sobre' src='https://blogger.googleusercontent.com/img/b/R29vZ2xl/AVvXsEgGRHLP5wvfJZ_TewAHxdNatvLDIJSgTluvjh6Wp6ni3RX21ptvV1gQmF8NkWFGtisb473Th-0KsEczOHw7VDCAvG5RP2AOiv_tW2uCEi48xKPuzc5LZo1tW40AZ1wDTgd0VnCZ6Z2UE4Q/s1600/magnolia.gif'/></a></li>

<li><a expr:href='&quot;http://www.blinklist.com/index.php?Action=Blink/addblink.php&amp;Description=&amp;Url=&quot; + data:post.url + &quot;&amp;title=&quot; + data:post.title' target='_blank'><img alt='Agregar a Blinklist' class='rsociales-sobre' src='https://blogger.googleusercontent.com/img/b/R29vZ2xl/AVvXsEjCt0fQsGQ5PEXJxnCkpFzzTzDvCsG6YVDAbJsLQ1T_gYjK42NIULwnIi1Ky2CHHs9K-GMSGgh1lFB7LB1TlowHTbmzW-jIdRDGglfONEAnfP1dnnTRMcvCwwn2L8_veipCKyjdpvYppuU/s1600/blinklists.gif'/></a></li>

<li><a expr:href='&quot;http://blogmarks.net/my/new.php?mini=1&amp;simple=1&amp;url=&quot; + data:post.url + &quot;&amp;title=&quot; + data:post.title' target='_blank'><img alt='Agregar a Blogmarks' class='rsociales-sobre' src='https://blogger.googleusercontent.com/img/b/R29vZ2xl/AVvXsEj-1HvuFk5BMyvhWFASADQQOXwCtG_ZKAydSM0CQoq6KDtJHxKvWd4lyJIGtUHRFe9vbWiB7wOPkvkkK9LDJ5kAHnPvnT95pa7u7YUhuia7gq-CoGk-C-3WBKLTerivB2xAI2E1S3reeYw/s1600/blogmarks.gif'/></a></li>

<li><a expr:href='&quot;http://www.facebook.com/sharer.php?u=&quot; + data:post.url + &quot;&amp;title=&quot; + data:post.title' target='_blank'><img alt='Agregar a facebook' class='rsociales-sobre' src='http://lh5.ggpht.com/jaloee/SJNIyWWQmEI/AAAAAAAACRY/4GVE3Qxqg34/facebook.gif'/></a></li>

<li><a expr:href='&quot;http://twitter.com/home?status=&quot; + data:post.url + &quot;&amp;title=&quot; + data:post.title' target='_blank'><img alt='Agregar a twitter' class='rsociales-sobre' src='http://lh6.ggpht.com/jaloee/SJNIyl7oKlI/AAAAAAAACRc/8cc7q_upZI4/twitter.gif'/> </a></li>


<li><a expr:href='&quot;http://negaraku.net/fav.php?url=&quot; + data:post.url + &quot;&amp;title=&quot; + data:post.title' target='_blank'><img alt='Agregar a Negaraku!' class='rsociales-sobre' src='http://h1.ripway.com/syamzone/negaraku.png'/></a></li>


</ul>

</div>

9. Pilih PREVIEW untuk melihat hasilnya.

10. Sekiranya anda berpuas hati SAVE TEMPLATE.

Sumber asal Jaloe dan sedikit pengubahsuaian di lakukan oleh SyamZone™.

READ MORE...

Memasang 'Sprinkle Effect'.

1. Masuk akaun Blogger.

2. Pilih 'Layout'--> 'Add a Gadget'--> 'Html / Javascript'.

3. Copy kod di bawah dan Paste.

4. Save.

<script src=" http://syamzone.fileave.com/cursor sprinkle yellow.txt

" type="text/javascript"> </script>

5. Anda boleh menggantikan text yang berwarna biru kepada :

green

red

pink

blue

black

silver

READ MORE...

Menambah 'Breadcrumbs Trail'.


Screenshot di atas adalah contoh 'Breadcrumbs Trail'.

'Breadcrumbs Trail' akan berada di atas tajuk post/entri.


1. Sign in akaun blogger anda.

2. Pilih LAYOUT --> EDIT HTML.

3. BACKUP TEMPLATE anda dahulu untuk mengelakkan sebarang masalah.

4. Klik pada EXPAND WIDGET TEMPLATE seperti screenshot di bawah ini.

Malaysia Blogger Hack

5. Cari kod ini.


<b:includable id='main' var='top'>

6. Copy kod di bawah dan letakkan di atas kod tadi.

<b:includable id='breadcrumbs' var='post'>

<!-- Breadcrumbs hack. By Hoctro 9/11/2006 http://hoctro.blogspot.com -->

<b:if cond='data:blog.pageType == "item"'>

<p class='breadcrumbs'>

<span class='post-labels'>

<b:if cond='data:post.labels'>

You are here:

<a expr:href='data:blog.homepageUrl' rel='tag'>Home</a> >

<b:loop values='data:post.labels' var='label'>

<b:if cond='data:label.isLast == "true"'>

<a expr:href='data:label.url' rel='tag'><data:label.name/></a>

</b:if>

</b:loop>

<b:if cond='data:post.title'>

> <b><data:post.title/></b>

</b:if>

</b:if>

</span>

</p>

</b:if>

<!-- End of Breadcrums Hack -->

</b:includable>

7. Cari kod ini.

<b:if cond='data:post.dateHeader'>

8. Copy kod di bawah dan letakkan di atas kod tadi.

<b:include data='post' name='breadcrumbs'/>

9. Sekarang cari kod ini.

]]></b:skin>

10. Kemudian Copy kod CSS di bawah dan tambahkan di atas kod tadi.

.breadcrumbs {
border-bottom:1px dotted #000;
margin:2em 0 0.5em;
padding:0 0 0.5em;
}

11. Save Template.

12. Untuk melihat hasilnya klik pada tajuk post/entri anda dan lihat di bahagian atas.

Sumber Hoctro

READ MORE...

Menukarkan Text Read More Kepada Image.

Text Read More Kepada Image

Menukarkan text Read More... kepada Image.

Sekiranya anda belum memasang Read More... anda perlu memasang Read More... terlebih dahulu.

Bagaimana untuk memasangnya ? Sila rujuk tutorial cara-cara memasang Auto Read More.

Setelah siap memasang Read More... Sila ikuti langkah selanjutnya bagaimana untuk menukarkan text Read More... kepada image.

1. SIGN IN akaun blogger.

2. Pilih LAYOUT ---> EDIT HTML.

3. Klik pada EXPAND WIDGET TEMPLATE seperti screenshot di bawah ini.

Blog Tricks Read More

4. Cari kod Html ini.

<span class='rmlink' style='float:left'><a expr:href='data:post.url'>READ MORE - <data:post.title/></a></span>

5. Gantikan text READ MORE - dengan kod image di bawah.

<img src='https://blogger.googleusercontent.com/img/b/R29vZ2xl/AVvXsEimNDG1YcIIiH-4EMnJPyYKs_9P5JklI2qNuVxJXeNV48NaQ7mL3BgHRNDNXYy1RHrmvDPfBegQcyAa1qbwDmmYzPeKQw9JXrbJ5AqJfnYllkT-HGy8MQ2pX7azZy7SDEHBbTh8dK9wObhF/s400/New-Read-More.png'/></a>

6. Gantikan Url Image berwarna biru kepada Url Image anda.

7. Pilih PREVIEW untuk melihat hasilnya.

8. Sekiranya anda berpuashati SAVE TEMPLATE.

9. Selamat Mencuba...

READ MORE...

Memasang 'Snapshots'.

Cara Mudah Memasang Snapshots

Sekiranya anda tidak mengetahui apa itu 'Snapshots'?

Gambarannya adalah seperti screenshot diatas.

Untuk melihat demo snapshots letakkan mouse anda di sini SyamZone™.

Panduan Untuk memasang 'Snapshots'.

01. Daftar akaun percuma anda di sini www.snap.com

02. Untuk mendaftar sila ikuti arahan yang disediakan.

Perhatian !!! Selepas mendaftar pastikan anda menyemak email anda untuk melakukan pengesahan.

Sekiranya anda mahu memasang kod snapshots secara manual.Sila ikuti langkah di bawah.

1. Sign in akaun blogger anda.

2. Pilih LAYOUT --> EDIT HTML.

3. Cari kod ini.


</body>

4. Letakkan kod snapshots anda di atas kod tadi.

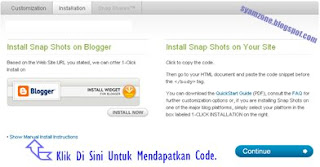
Bagaimana hendak mendapatkan kod snapshots?

Sila rujuk screenshot di bawah.

Snapshots Percuma Untuk Blogspot

READ MORE...